I’ve been growing increasingly concerned with the quality of hard drives being made today. It used to be that a hard drive would last you many years before you’d see a failure out of it. In fact, I still have hard drives that date back to the early 90’s that continue to work to this day. I can’t say the same for more recent drives, especially those that have been made in the last year or two, as I’ve just been constantly dealing with failed hard drives on my machines. I’ll preface my most recent experience with a little history first.
The Preface
I recently upgraded my raid machine, which is simply a low-power PC in a large case with four hard drives in it all set up as a Linux software RAID-5 array. Previously, I had used four 160GB IDE drives hooked up in the machine using a PCI controller card. That was fine for storage a few years ago when I built it, but recently I’ve managed to fill the thing, so it was clearly time for an upgrade. Considering that the entire array was less than a single 500GB drive, it’s not too surprising.
My plan was to buy four 500GB drives and increase the array to 1.5TB, but before the planned migration, I decided to buy a new 500GB drive on which to back up the current array. Sure I could have replaced the drives one by one, rebuilding the array each time and expending the partition when I was all done, but the machine was never quite set up the way I wanted it to be, and since I wanted to switch from IDE to SATA, I would have had a lot of tweaking to do. I also wasn’t sure how far I was stretching the PSU in the machine, because while it was running a low power VIA CPU, it was still powering five hard drives (the array and the main system drive). Backing everything up to another drive and starting a new array from scratch just made more sense, so that’s exactly what I did.
The Upgrade
After backing the information up to my new Seagate drive, I ordered and installed four brand new OEM Seagate drives from Newegg. I exclusively buy Samsung these days as it’s the only company that in the past has been reliable for me. Hitachi was infamous for their glass platter “Deathstar” line of drives, so they were not even a consideration. I stay far away from the cheap JB drive from Western Digital as both my experience and the experience of a data recovery company I used to use at a previous job had shown that the drives were very prone to failure. I’ve had a couple Maxtor drives fail on me too, but never Seagates, their drives were rocks.
Of the four new drives I ordered, one was shipped to me DOA. It would click when powered on, slow down the system POST tremendously, and it stopped me from being able to format the partition with Ubuntu. Oddly enough, Debian let me, so that’s what I installed. This was my first experience with SATA drives, so I thought the clicking was normal. Then once I had everything up and running, the controller card kept crashing when I was copying information to it the RAID array. Checking the logs showed me that one of the drives was failing, and when I pulled the drive from the machine, it posted in a split second and there was no clicking. Newegg was really good about the exchange for a working drive, but it didn’t instill a lot of confidence in me about the reliability of the drives. I continue without any more issues, but I think it speaks to the quality of these new drives as a whole.
The Failure and Recovery
That brings us to my most recent failure. The 500GB drive that I had used to backup the original array had found a permanent home in my desktop, where I made use of it extensively, eventually filling it completely and operating at 90% or higher capacity from then on. I started using the old 160GB drives in external enclosures as an intermediate backup method and even went so far as to backup a lot of what I was downloading a couple months ago. Unfortunately, I didn’t keep up with that, and when I came home last week to find my machine complaining about I/O errors with the drive, I wished I had. Luckily, the really important stuff on the drive wasn’t THAT important, so it wasn’t more than an inconvenience to lose the drive, but it was a big inconvenience that I really rather have not had deal with.
I unmounted and remounted the drive and attempted to pull a few files off the drive, but it was clicking and the machine started hanging and reporting more I/O errors. I put the drive into a USB enclosure and it started having problems with it spinning up, so I was pretty sure the drive motor had died, meaning I was in a hopeless situation. I tossed it in the freezer just to see if that would help, and magically it started to spool up again. I still couldn’t get the files off the drive though, and after enough time, it wouldn’t mount either; it was clear I needed to do something more drastic.
Fast forward to a couple days ago, my new 500GB replacement drive had shown up and I was attempting to use an old machine to perform a recovery. My plan was to try and clone what I could of the old drive onto the new one and see if I could repair the new one. This is a technique that the data recovery companies use, so it seemed like a good enough idea. Worst case scenario, I lose the information, so I was no worse off than I already was. The machine I was trying to use was my Mom’s old Celeron box that she bought some six years ago and recently replaced. The problem with using it was that the machine could only see the first 200GB or space on the 500GB drives; not really useful in my case. Part of the problem was that I was using Hiren’s Boot CD, which is full of DOS-based utilities that rely on the BIOS for drive information. Linux doesn’t have this problem, but all my LiveCDs had disappeared somehow and I didn’t feel like making a new one when I could simply toss the drives into my desktop. Plus, I didn’t think using dd to clone the drive would work. However, none of the DOS or Windows based software would do it, so it became my last hope.
I put both drives into my desktop and booted my Ubuntu install. Everything was going well; the drive stopped clicking, I disabled the auto-mount of the drive already so it wasn’t hanging the system and it had no problems seeing the drive. I still couldn’t mount it though, but that would hopefully be solved by cloning and repairing it. I jumped to the terminal since I didn’t need a GUI and fired up dd as follows:
1 | dd if=/dev/hdb of=/dev/hdc conv=noerror |
This is just a bitwise clone of the dying drive to the new one, and it tells dd not to quit on errors. This worked for a while, and while it was reporting many errors in the beginning, it didn’t stop. That is, until it got about 1.6GB in, then it reported that the destination drive had an I/O error. I was pretty sure that was a false report though and that the source just had some wacky problem that dd couldn’t recreate on the destination, so I re-ran the command passing in bs=1024. This was I knew how many bits it was using in 1 byte without any doubt and I could calculate where it was stopping. By my math, 1605884 bytes was where the bad part was, so I tried this:
1 | dd if=/dev/hdb of=/dev/hdc conv=noerror skip=1605884 seek=1605884 count=1 |
What that does is try to copy the first byte (and only the first byte) from the point of failure and appends it to the source exactly where it should. This failed, as I expected. This meant one of two things; I calculated it correctly and I was trying to copy the same bad spot or there were many bad spots on the drive and I was going to have a hell of a time continuing on. So I tried to copy the next byte in:
1 | dd if=/dev/hdb of=/dev/hdc conv=noerror skip=1606908 seek=1606908 count=1 |
This time it worked! So, I dropped the count so that it would keep going until the next error. Luckily for me though, it was the last error on the drive, and five hours later, I had a clone of the damaged drive. Things were looking good! Of course, I still couldn’t mount the clone, but at least I had a reliable platform for a restoration. Next, I had to repair the single XFS partition on the drive:
1 | xfs_repair -n /dev/hdc1 |
The -n option says to not write any changes, only report what would be changed. This was a huge report as it was going to fix a LOT of errors. But, again, what did I have to lose? So I ran it without the -n and crossed my fingers. It failed…… but only because it had an outstanding log. Because XFS is a journaling filesystem, that journal (or log) was not written to the drive when it crashed. I captured the log with xfs_metadump but I couldn’t find out how to write that log to the drive. So, I ran xfs_repair again without the -n but this time with -L, which forces the log to clear before the repair.
1 | xfs_repair -L /dev/hdc1 |
The Results
This ran for a few minutes, and when it was done, I could mount the drive! But I still wasn’t where I wanted to be. Because the journal was lost and because the superblock had gotten corrupted, all the files were moved to the lost+found directory and the filenames were simply the inode values. This was nearly worthless, as you can see by the screen capture below.
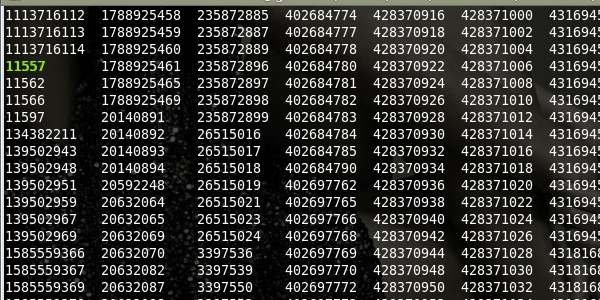
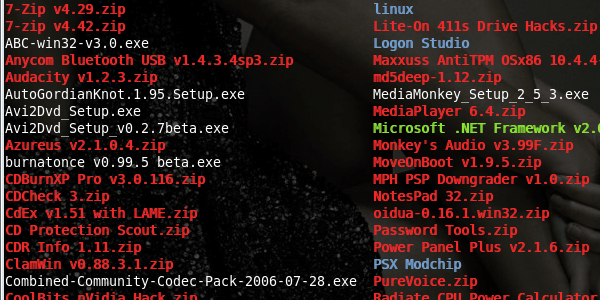
Basically, the filesystem lost the information about the filename and location of many of the files and directories. I started to get ready to re-run the clone and replay the log before the recovery to see if it helped, but I decided to see what was in one of the directories before I ran the cloning for another five or six hours. To my surprise, the information inside the directories was properly named, as shown by the screenshot below.
After sorting out the proper directory names I started comparing the backups that I had with the files that were recovered. All of the md5sums I ran resulted in matches, which means that I likely recovered 99% to 100% of the files without corruption. There were a lot of stray mp3s that were not properly named (at least nautilus thinks they are mp3s), but the few important files I actually wanted to back up as well as a lot of other very large files were all OK. My Virtualbox images, video files, mp3s, N800 map data, it was all OK! So now I am copying the recovered information to my raid array and making four backups of the information I really cared about. I’ll sort through it all later, for now, I’m just happy that it worked!
I guess the lesson to learn here is that before you write off your data as lost or send your failing drive off to a recovery company and spending thousands of dollars to get your data back, it might be worth spending a little time on your own to see what you can accomplish. Of course, recovery is no substitute for backups! ALWAYS KEEP RECENT BACKUPS OF YOUR INFORMATION!!! And, if the drive is audibly failing (clicking, grinding, spooling up and back down), don’t power it on unless you don’t plan to get that information back as it’s probably a mechanical failure that is destroying your information as it’s running. Now, back to sorting out this data, and backing it up!
UPDATE: I now keep all my files in triplicate, on at least 2 different machines. Really important stuff I keep additional copies on external drives and DVD, as well as on Dropbox and Amazon’s S3.
UPDATE2: I’ve started burning to BluRay discs, and even built a 1x3 disc duplication tower to make quick duplicates. I’ve ditched Dropbox (though may go back), and S3 has been serving me well since I started using it. Glacier, on the other hand, was a total mess, and I find S3 to be with the price difference, epsecially with their new Infrequent Access pricing.